
Authorization
What is authorization?
Authorization is the process of granting an integration access to a user’s Notion data. That process varies depending on whether or not the integration is public or internal.
Link Preview integrations — a subcategory of public integrations — use two-way OAuth, which differs from the authorization flow described in this guide.
See the Build a Link Preview integration guide to learn more about Link Preview authorization.
What is an internal integration?
An internal integration allows Notion workspace members to interact with the workspace through the Notion REST API. Each internal integration is tied to a single, specific workspace and only members within the workspace can use the integration. After an internal integration is added to a workspace, members must manually give the integration access to the specific pages or databases that they want it to use.
What is a public integration?
Public integrations can be used by any Notion user in any workspace. They allow members to interact with their workspace using Notion’s REST API once the integration has been properly authorized.
Public integrations follow the OAuth 2.0 protocol. This allows workspace members to give access to Notion pages directly through the auth flow, without having to open each Notion workspace page directly and manually give permission to the integration. (More on this below.)
Public integrations can technically be used without permitting workspace pages access as long as the auth flow is completed and an access token is created — a process which will be described in detail below. For example, if a public integration only needs to interact with the Notion User endpoints, it does not need to be given access to workspace pages.
For more details on the differences between public and internal integrations, refer to the getting started page.
Read on to learn how to set up the auth flows for internal and public integrations.
Internal integration auth flow set-up
To use an internal integration, start by creating your integration in the integration’s settings page.
The internal integration will be associated with the workspace of your choice. You are required to be a workspace owner to create an integration.
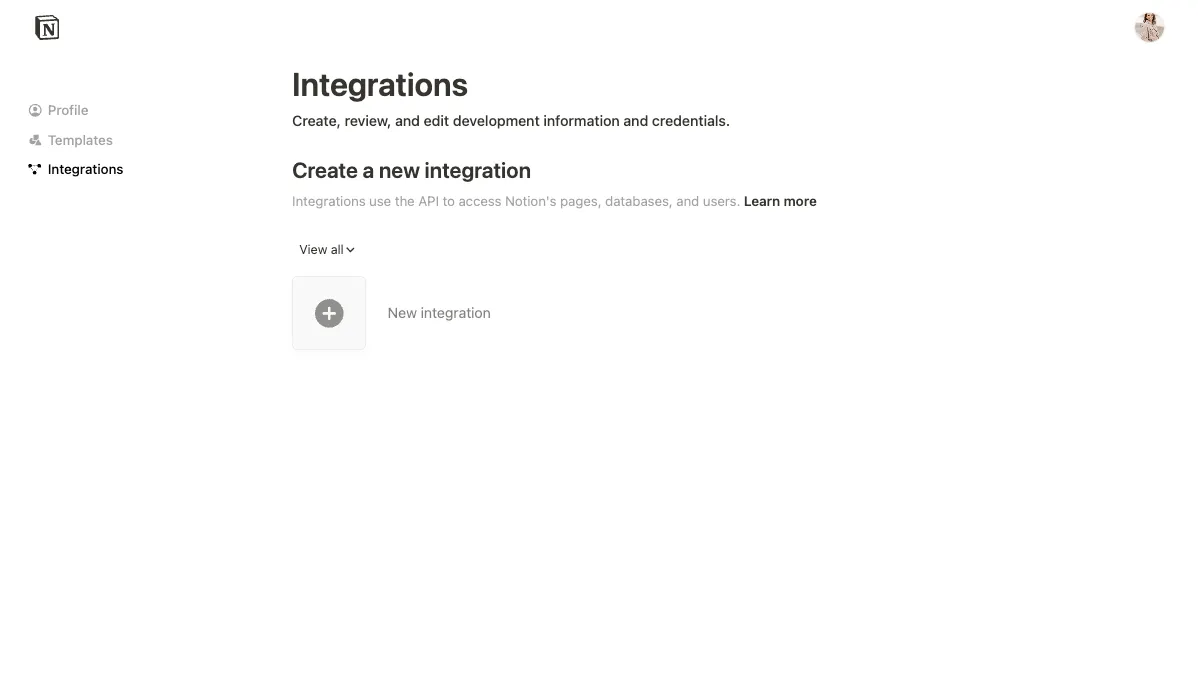
Click the New integration button on the My integrations page to create a new integration.
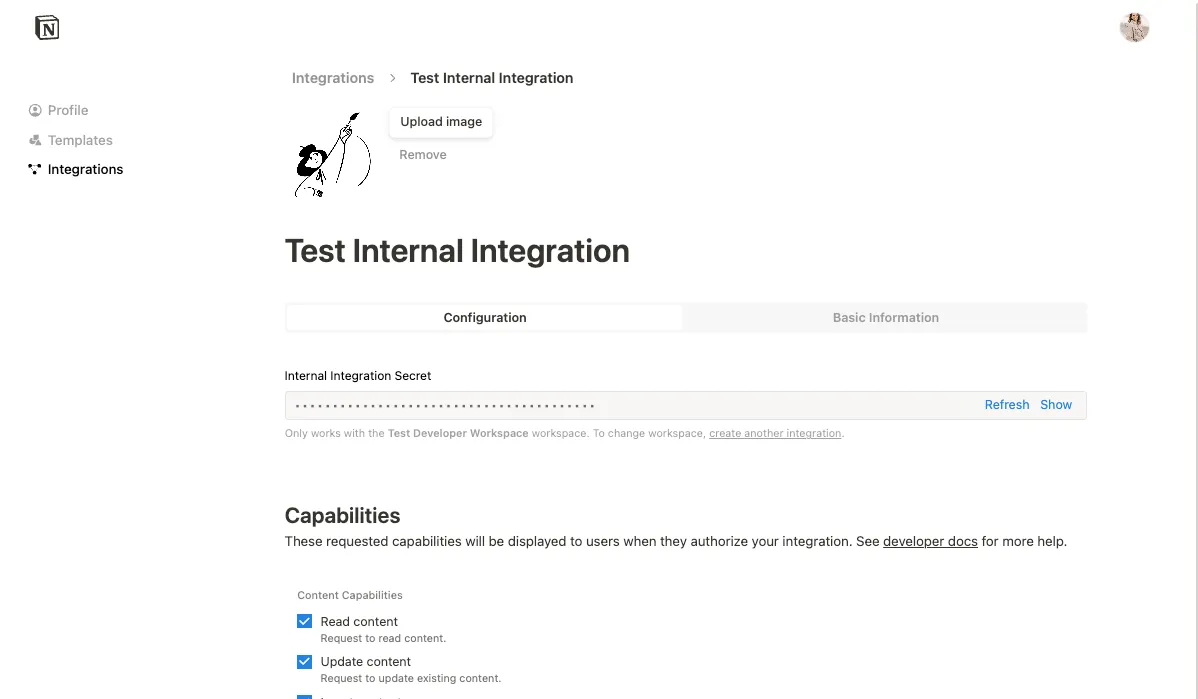
Once the integration is created, you can update its settings as needed under the Configuration tab and retrieve the integration token in this tab.
The integration token will be used to authenticate REST API requests. The integration sends the same token in every API request.
Integration permissions
Before an integration can interact with your Notion workspace page(s), the page must be manually shared with the integration. To share a page with an integration, visit the page in your Notion workspace, click the ••• menu at the top right of a page, scroll down to Add connections, and use the search bar to find and select the integration from the dropdown list.
Once the integration is shared, you can start making API requests. If the page is not shared, any API requests made will respond with an error.
Your integration token is a secret. To keep your integration secure, never store the token in your source code or commit it in version control. Instead, read the token from an environment variable. Use a secret manager or deployment system to set the token in the environment.
Making API requests with an internal integration
Any time your integration is interacting with your workspace, you will need to include the integration token in the Authorization header with every API request. However, if you are using Notion’s SDK for JavaScript to interact with the REST API, the token is set once when a client is initialized.
If you are not using the Notion SDK for JavaScript, you will also need to set the Notion-Version and Content-type headers in all of in your requests, like so:
If you receive an error response from the API, check if the integration has been properly added to the page. If this does not solve the problem, refer to our Status codes page for more information.
Public integration auth flow set-up
When an integration is made public, any Notion user in any workspace can use it.
Since a public integration is not tied to a single workspace with a single integration token, public integrations instead follow the OAuth 2.0 protocol to authorize an integration to interact with a workspace.
How to make a public integration
Select New Integration in your integration dashboard and select Public in the integration Type during the creation flow. You may also edit an existing internal integration to convert to Public.
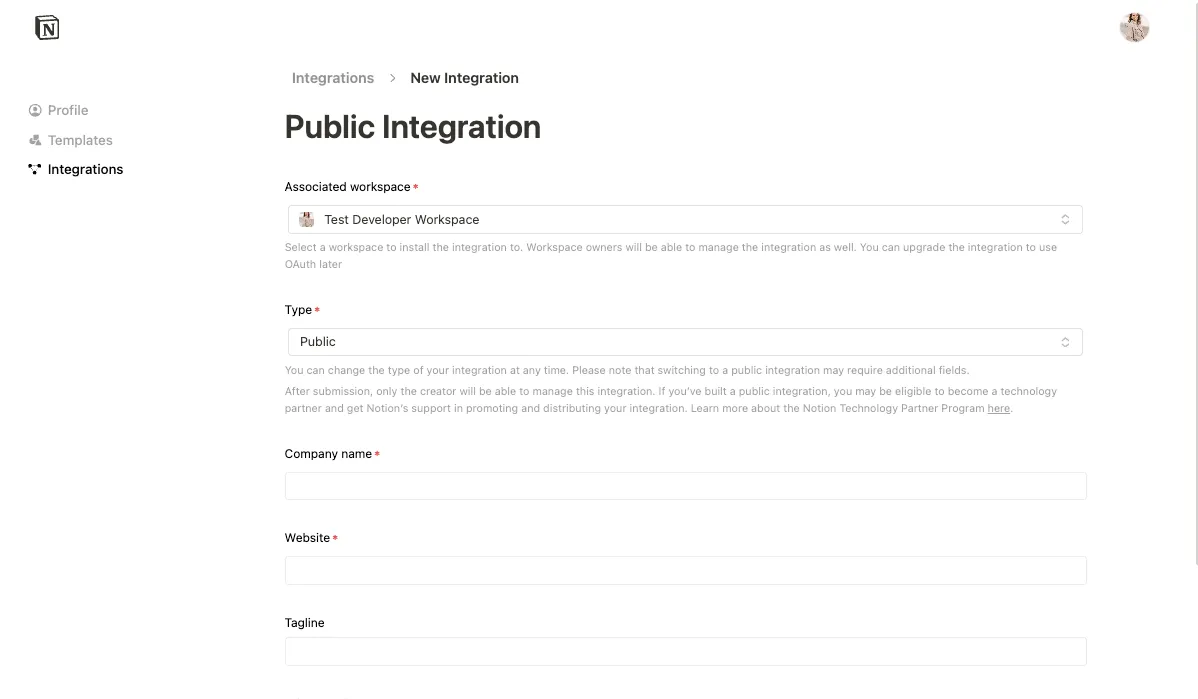
You will need to fill out the form with additional information, including your company name, website, and redirect URI(s).
The redirect URI is the URI your users will be redirected to after authorizing the public integration. To learn more, read OAuth’s description of redirect URIs.
Public integration authorization overview
Once your integration has been made public, you can update your integration code to use the public auth flow.
As an overview, the authorization flow includes the following steps. Each step will be described in more detail below.
- Navigate the user to the integration’s authorization URL. This URL is provided in the integration’s settings page.
- After the user selects which workspace pages to share, Notion redirects the user to the integration’s redirect URI and includes a
codequery parameter. The redirect URI is the one you specified in your integration’s settings page. - You will make a
POSTrequest to create an access token , which will exchange the temporarycodefor an access token. - The Notion API responds with an access token and some additional information.
- You will store the access token for future API requests. View the API reference docs to learn about available endpoints.
Navigate the user to the integration’s authorization URL
After your integration has been successfully made public in your integration’s settings page, you will be able to access the integration’s secrets in the Configuration tab. Similarly to the internal integrations, these values should be protected and should never be included in source code or version control.
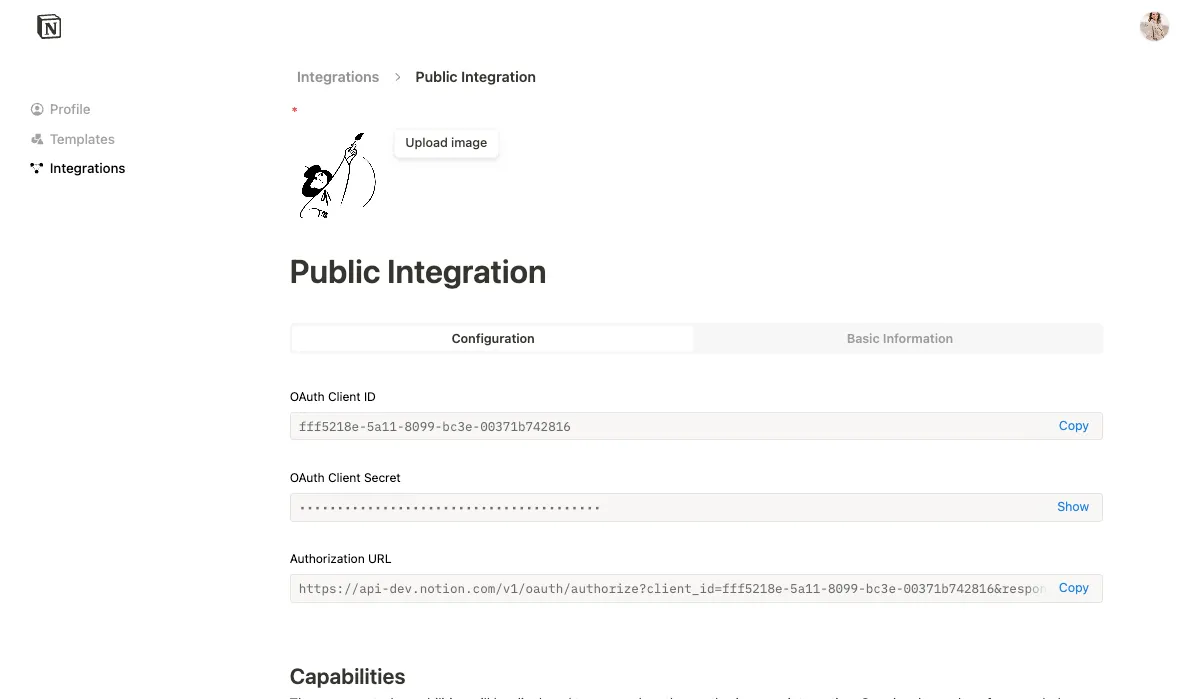
As an example, your .env file using these secrets could look like this:
To start the authorization flow for a public integration, you need to direct the prospective user to the authorization URL. To do this, it is common to include a hyperlink in the integration app that will be interacting with the Notion REST API. For example, if you have an app that will allow users to create new Notion pages for their workspace(s), you will first need them to first visit the authorization URL by clicking on the link.
The following example shows an authorization URL made available through a hyperlink:
The URL begins with https://api.notion.com/v1/oauth/authorize and has the following parameters:
Once the authorization URL is visited, the user will be shown a prompt that varies depending on whether or not the integration comes with a Notion template option.
Prompt for a standard integration with no template option (Default)
In the standard integration permissions flow, a prompt describes the integration capabilities, presented to the user as what the integration would like to be able to do in the workspace. A user can either select pages to grant the integration access to, or cancel the request.
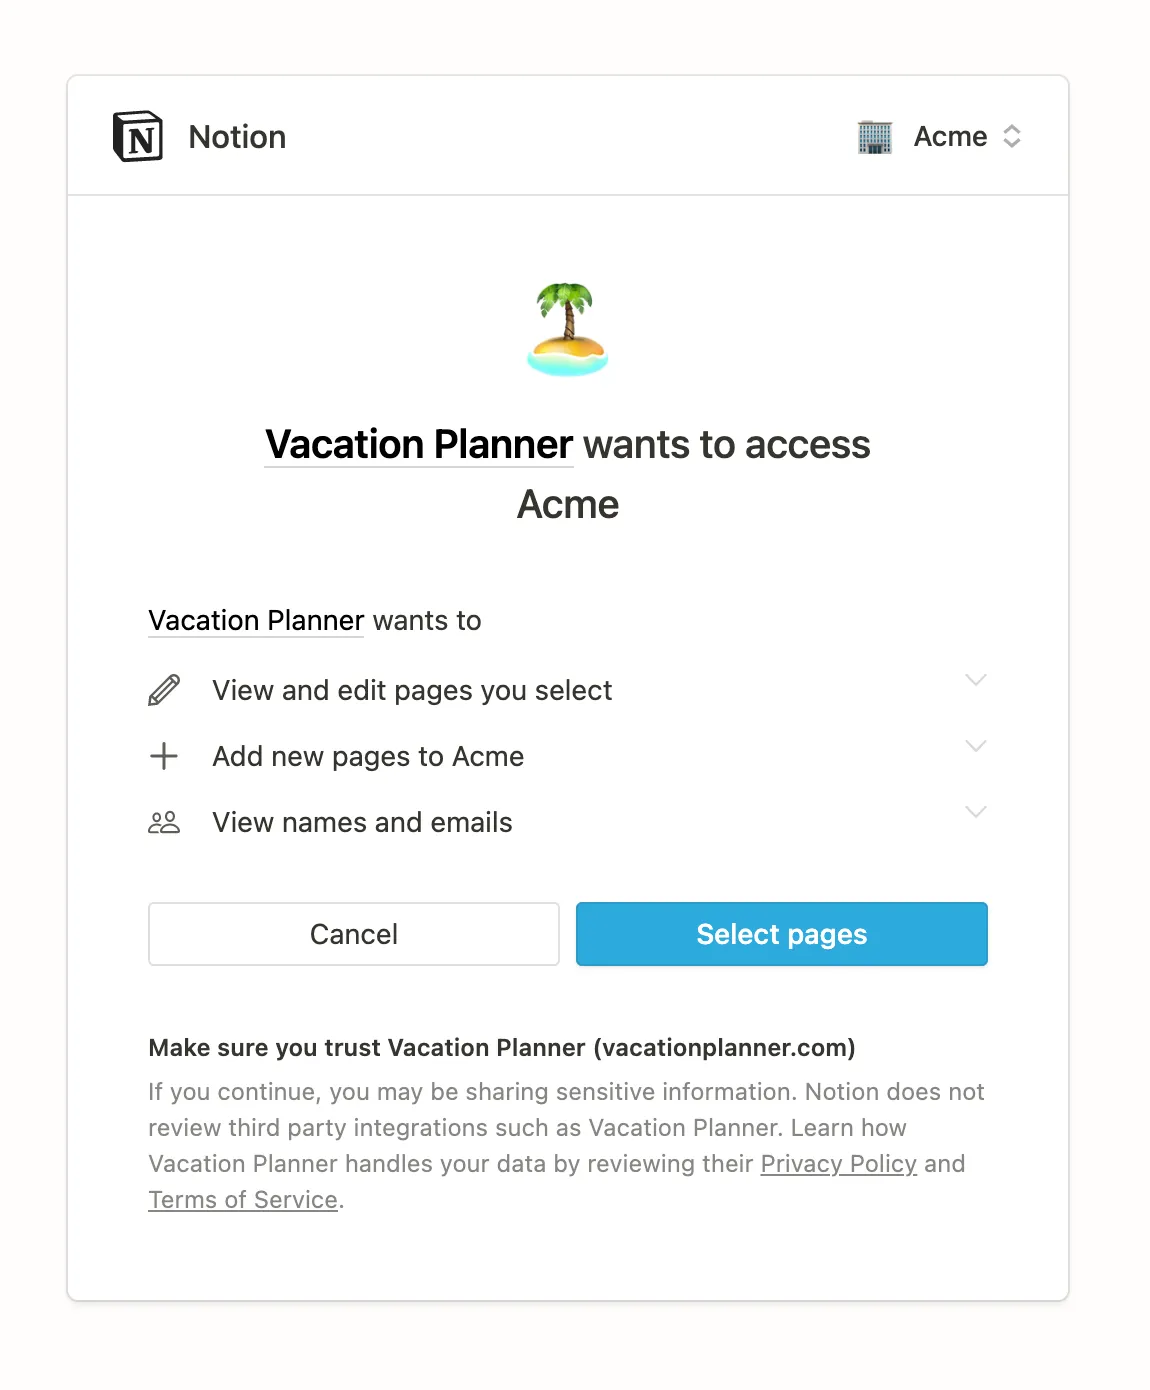
If the user presses Cancel, they will be redirected to the redirect URI with and error query param added.
You can use this errorquery parameter to conditionally update your app’s state as needed.
If the user opts to Select pages, then a page picker interface opens. A user can search for and select pages and databases to share with the integration from the page picker.
The page picker only displays pages or databases to which a user has full access, because a user needs full access to a resource in order to be able to share it with an integration.
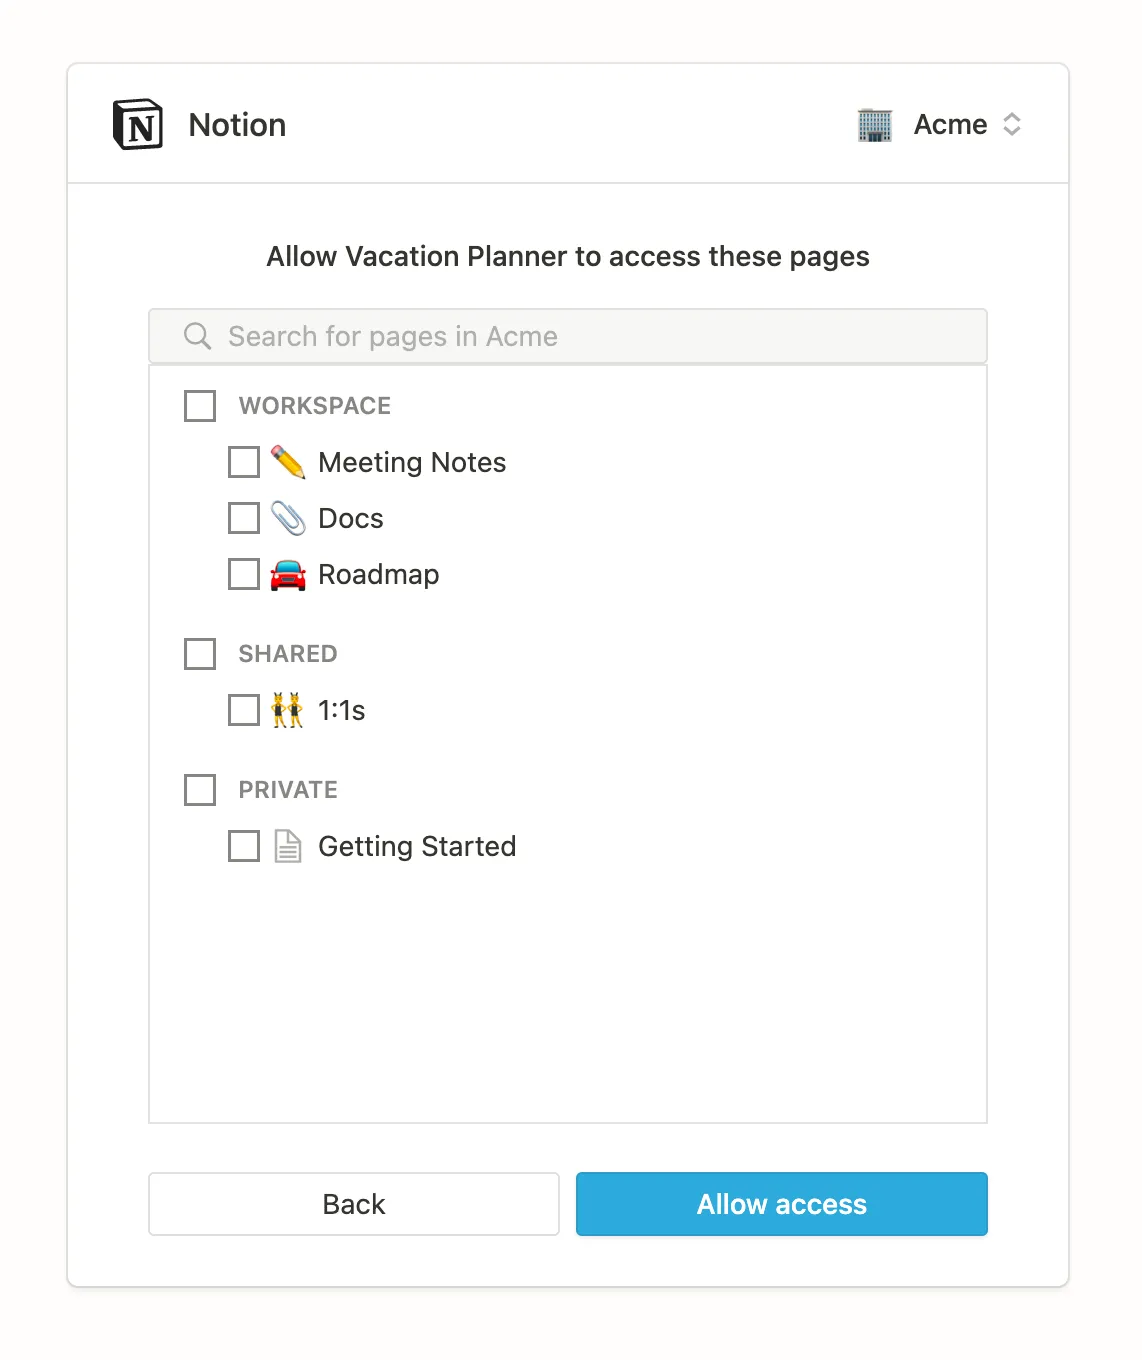
Users can select which pages to give the integration access to, including both private and public pages available to them. Parent pages can be selected to quickly provide access to child pages, as giving access to a parent page will provide access to all available child pages. Users can return to this view at a later time to update access settings if circumstances change.
If the user clicks Allow access, they are then redirected to the redirect_uri with a temporary authorization code. If the user denies access, they are redirected to the redirect_uri with an error query parameter.
If the user clicks Allow access and the rest of the auth flow is not completed, the integration will not have access to the pages that were selected.
Prompt for an integration with a Notion template option
Public integrations offer the option of providing a public Notion page to use as a template during the auth flow.
To add a template to your workspace, complete the following steps:
- Choose a public page in your workspace that you want users to be able to duplicate.
- Navigate to your integration’s settings and go to the Basic Information tab.
- Scroll to the bottom of your distribution settings and add the URL of the Notion page you selected to the Notion URL for optional template input.
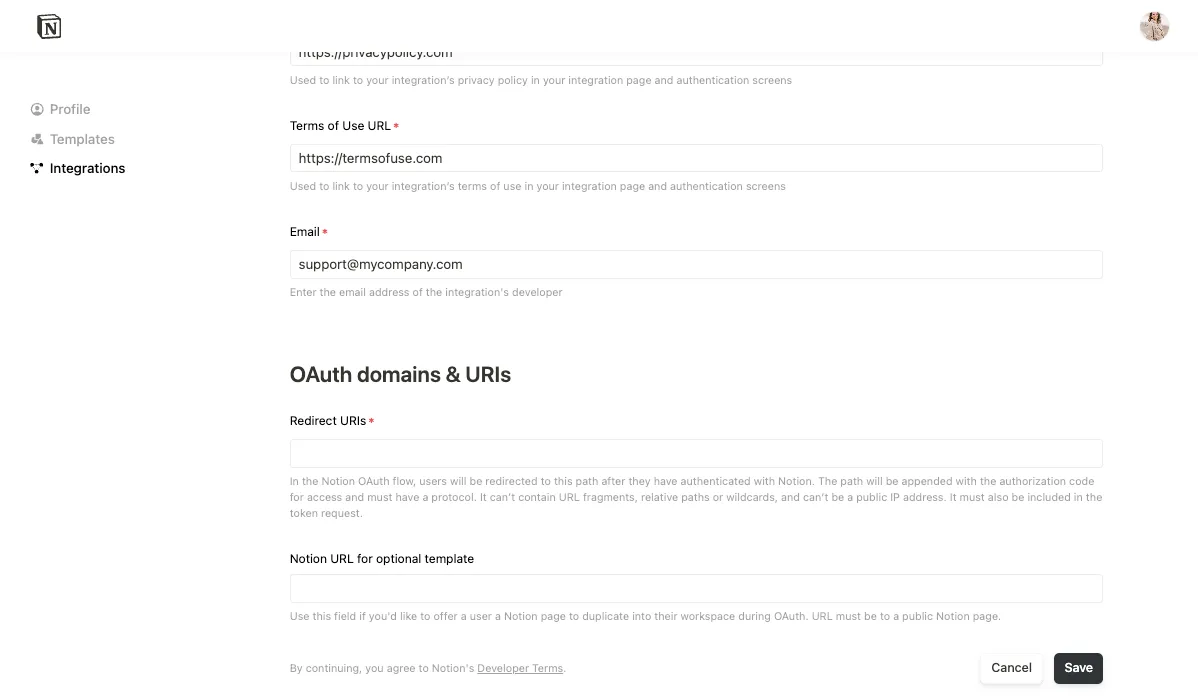
Once this URL is added, your auth flow prompt appearance will be updated.
Going back to your prompt view, if the integration offers a Notion template option, the first step in the permissions flow will describe the integration capabilities. This is presented to the user as what the integration would be able to do in the workspace, and it prompts the user to click Next.
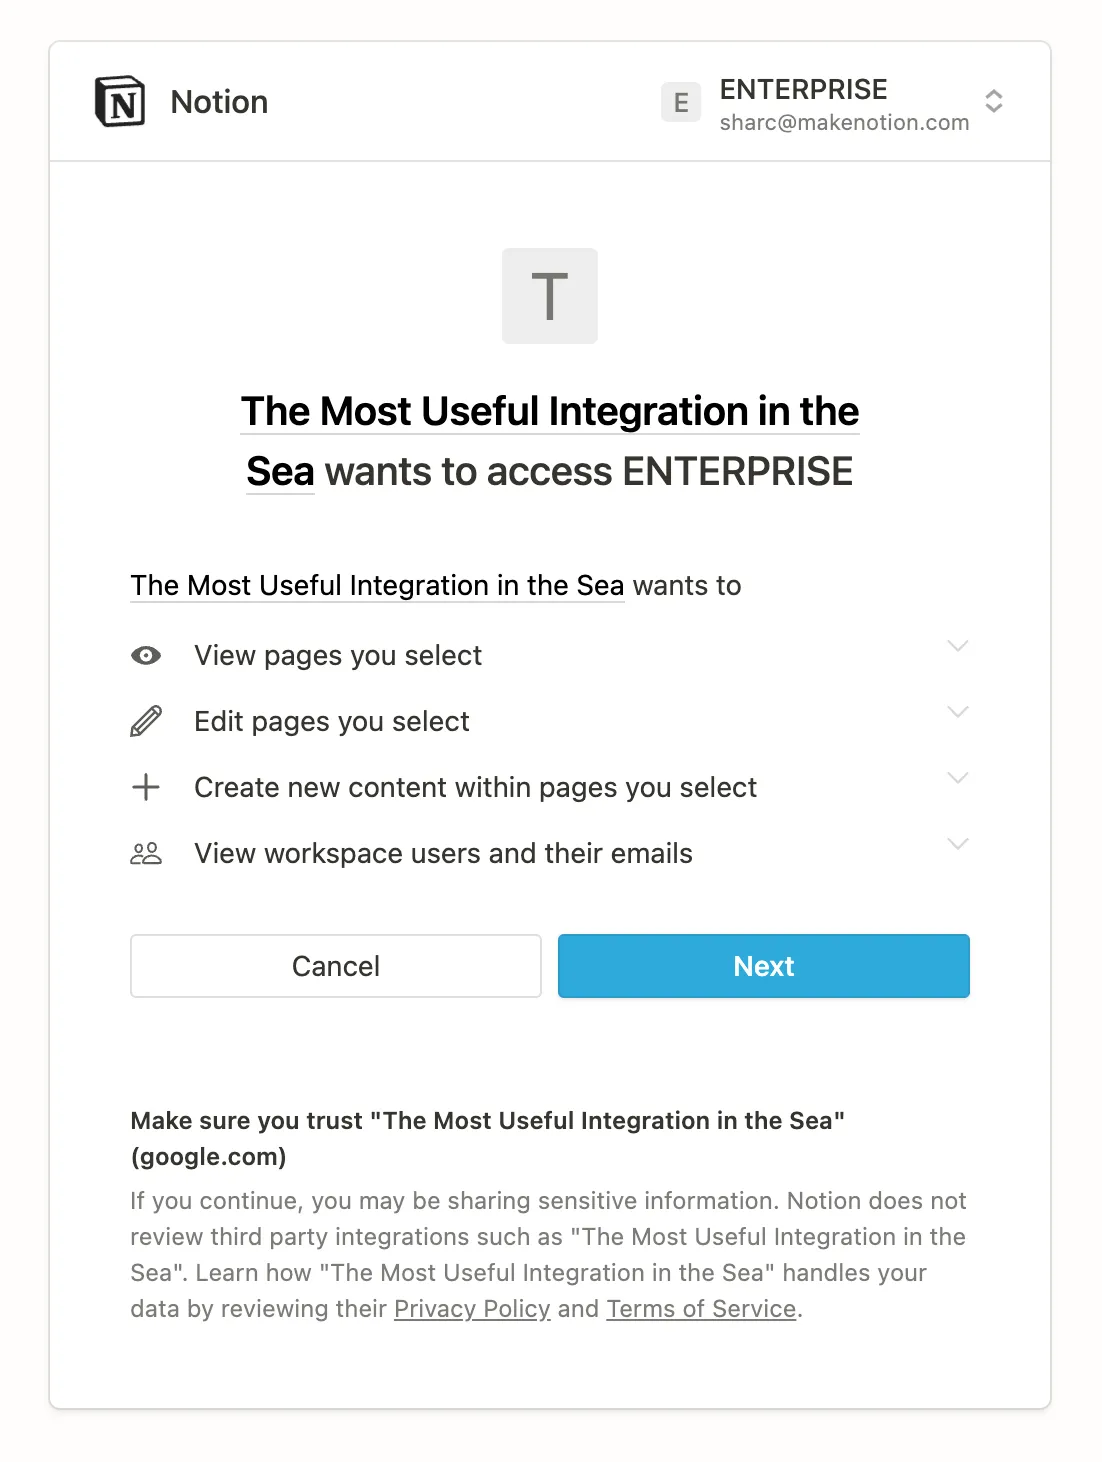
In the next step, a user can either choose to duplicate the template that you provided or to select existing pages to share with the integration.
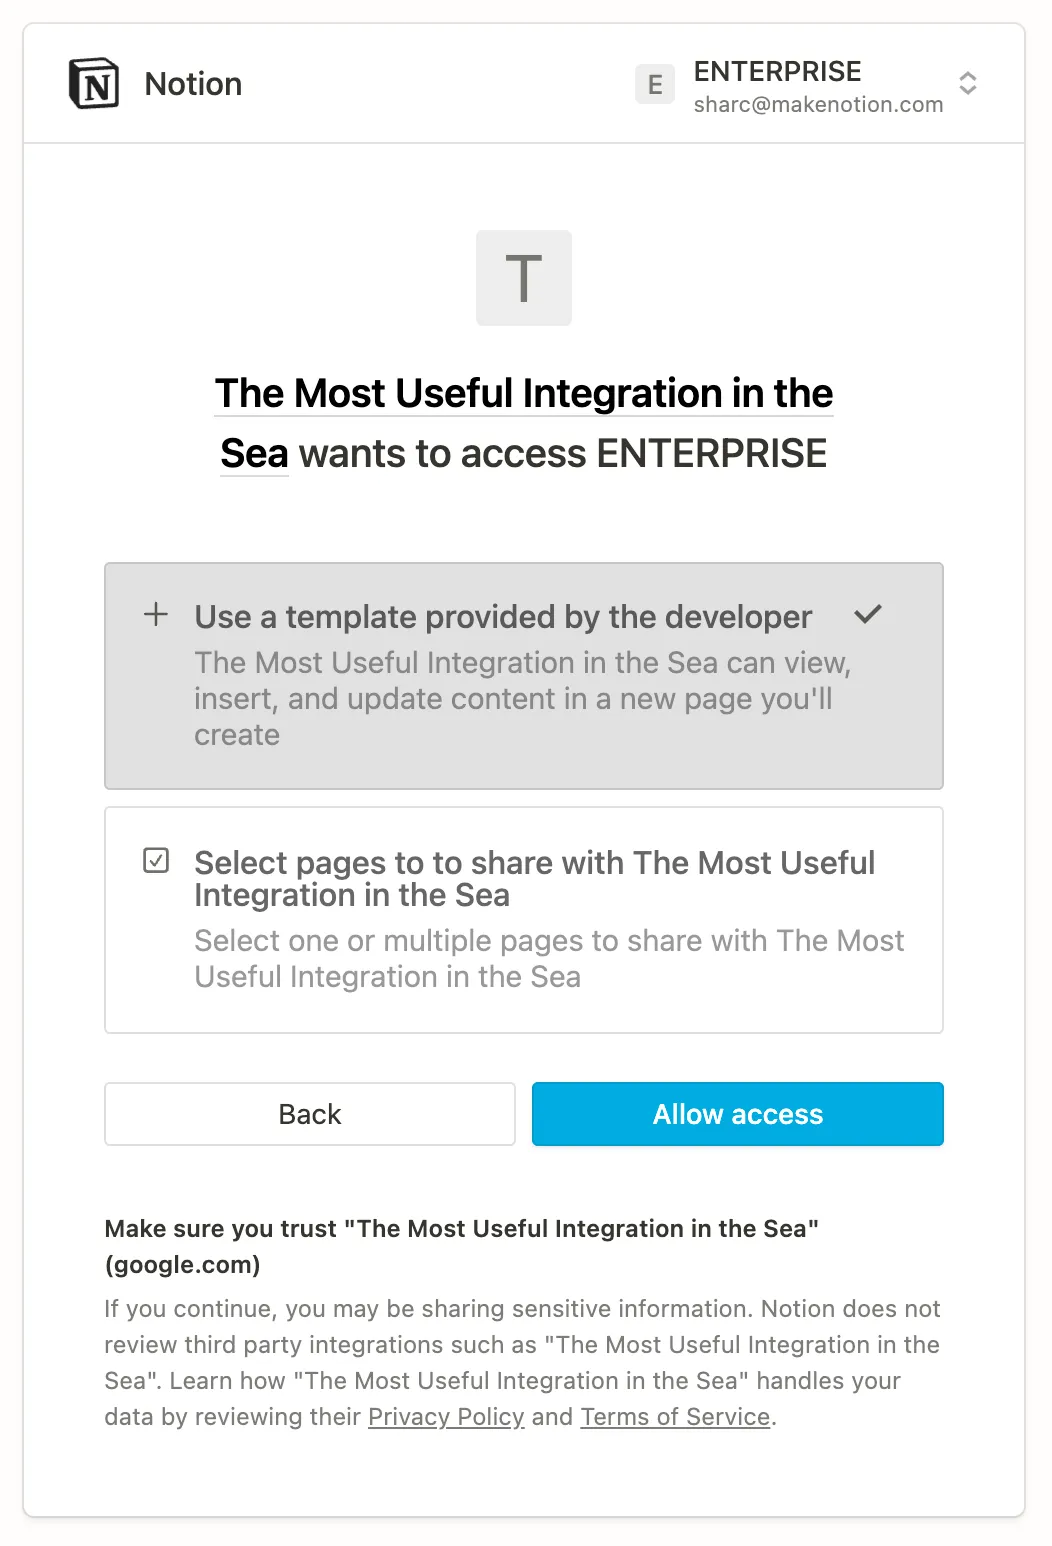
If the user chooses to duplicate the template, then the following happens automatically:
- The integration is added to the user’s workspace.
- The template is duplicated as a new page in the workspace.
- The new page is shared with the integration.
If the user chooses to select pages to share with the integration, then they continue to the page picker interface that’s part of the prompt for a standard integration.
After a user installs a public integration, only that user is able to interact or share pages and databases with the integration. Unlike internal integrations, if multiple members in a workspace want to use a public integration, each prospective user needs to individually follow the auth flow for the integration.
User authorization failures
User authorization failures can happen. If a user chooses to Cancel the request, then a failure is triggered. Build your integration to handle these cases gracefully, as needed.
In some cases, Notion redirects the user to the redirect_uri that you set up when you created the public integration, along with an error query parameter. Notion uses the common error codes in the OAuth specification. Use the error code to create a helpful prompt for the user when they’re redirected here.
Notion redirects the user to the integration’s redirect URI and includes a code parameter
When you first created the public integration, you specified a redirect URI. If the user follows the prompt to Allow access for the integration, then Notion generates a temporary code and sends a request to the redirect URI with the following information in the query string:
To complete the next set, you will need to retrieve the code query parameter provided in the redirect. How you retrieve this value will vary depending on your app’s tech stack.
In a React component, for example, the query parameters are made available through the useRouter() hook:
Send the code in a POST request to the Notion API
The integration needs to exchange the temporary code for an access_token.
To set up this step, retrieve the code from the redirect URI.
Next, you will need to send the code as part of a POST request to Notion’s token endpoint: https://api.notion.com/v1/oauth/token.
This endpoint is described in more detail in the API reference docs for creating a token.
The request is authorized using HTTP Basic Authentication. The credential is a colon-delimited combination of the integration’s CLIENT_ID and CLIENT_SECRET, like so:
You can find both of these values in the integration’s settings.
Note that in HTTP Basic Authentication, credentials are base64 encoded before being added to the Authorization header.
The body of the request contains the following JSON-encoded fields:
The following is an example request to exchange the authorization code for an access token:
The Node-equivalent of this example would look something like this:
Notion responds with an access_token , refresh_token, and additional information
Notion responds to the request with an access_token, refresh_token, and additional information. The access_token will be used to authenticate subsequent Notion REST API requests. The refresh_token will be used to refresh the access token, which generates a new access_token.
The response contains the following JSON-encoded fields:
Token request failures
If something goes wrong when the integration attempts to exchange the code for an access_token, then the response contains a JSON-encoded body with an "error" field. Notion uses the common error codes from the OAuth specification.
The integration stores the access_token and refresh_token for future requests
You need to set up a way for your integration to store both the access_token and refresh_token that it receives. The access_token is used to make authorized requests to the Notion API, and the refresh_token is used to generate a new access_token.
Tips for storing and using token access
- Setting up a database is a typical solution for storing access tokens. If you’re using a database, then build relations between an
access_token,refresh_token, and the corresponding Notion resources that your integration accesses with that token. For example, if you store a Notion database or page ID, relate those records with the correctaccess_tokenthat you use to authorize requests to read or write to that database or page, and therefresh_tokenfor ongoing token lifecycle support.. - Store all of the information that your integration receives with the
access_tokenandrefresh_token. You never know when your UI or product requirements might change and you’ll need this data. It’s really hard (or impossible) to send users to repeat the authorization flow to generate the information again. - The
bot_idreturned along with your tokens should act as your primary key when storing information.
Refreshing an access token
Refreshing an access token will generate a new access token and a new refresh token.
You will need to send the refresh_token provided from Step 4 as part of a POST request to Notion’s token endpoint: https://api.notion.com/v1/oauth/token.
This endpoint is described in more detail in the API reference docs for refreshing a token.
The request is authorized using HTTP Basic Authentication. The credential is a colon-delimited combination of the integration’s CLIENT_ID and CLIENT_SECRET, like so:
You can find both of these values in the integration’s settings.
Note that in HTTP Basic Authentication, credentials are base64 encoded before being added to the Authorization header.
The body of the request contains the following JSON-encoded fields:
The following is an example request to exchange the refresh_token for a new access token and new refresh token
The Node-equivalent of this example would look something like this: