> For clean Markdown of any page, append .md to the page URL.
> For a complete documentation index, see https://notion.ferndocs.com/llms.txt.
> For AI client integration (Claude Code, Cursor, etc.), connect to the MCP server at https://notion.ferndocs.com/_mcp/server.

# Build your first integration

## Integration overview

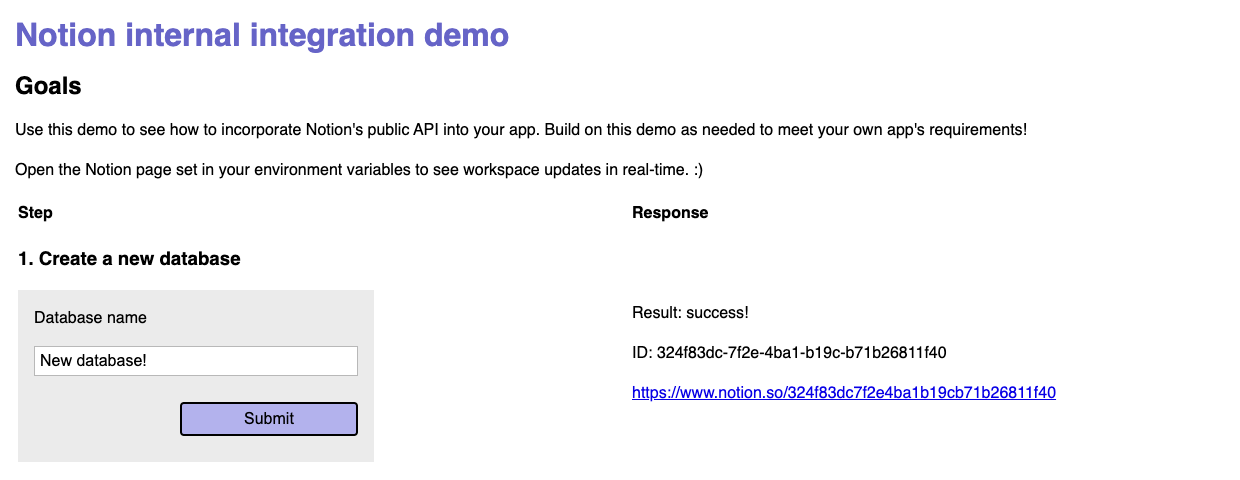
In this guide, we’re going to build an [internal Notion integration](/docs/getting-started#internal-integrations) that can create a new database in your Notion workspace via a web form.

<Frame caption="Demo web app that creates new databases in your Notion workspace.">
  <img src="https://files.readme.io/55d7b4b-dbform.png" alt=""/>
</Frame>


Internal integrations are a good entry point to building integrations because they have a simpler [authorization](/docs/authorization) flow than [public integrations](/docs/getting-started#public-integrations).

Before diving in, let’s quickly review Notion integrations. Integrations define how the public API can programmatically interact with your Notion workspace. They need to be authorized (i.e., given explicit permission) to make any changes your workspace.

All integration types use Notion’s public API to make requests to update a Notion workspace. The specific use case for each integration can vary greatly, from using Notion as a CMS for a blog, to [tracking Github issues](https://github.com/makenotion/notion-sdk-js/tree/main/examples/notion-github-sync), to [sending emails](https://github.com/makenotion/notion-sdk-js/tree/main/examples/database-email-update) in response to Notion changes.

This guide is just one introductory example of what you can build with Notion’s public API.

## Today’s goals

This guide will demonstrate how to build an HTML form that will [create a new Notion database](/reference/create-a-database) when submitted.

By the end of this guide, we’ll have a functional app that looks like this:
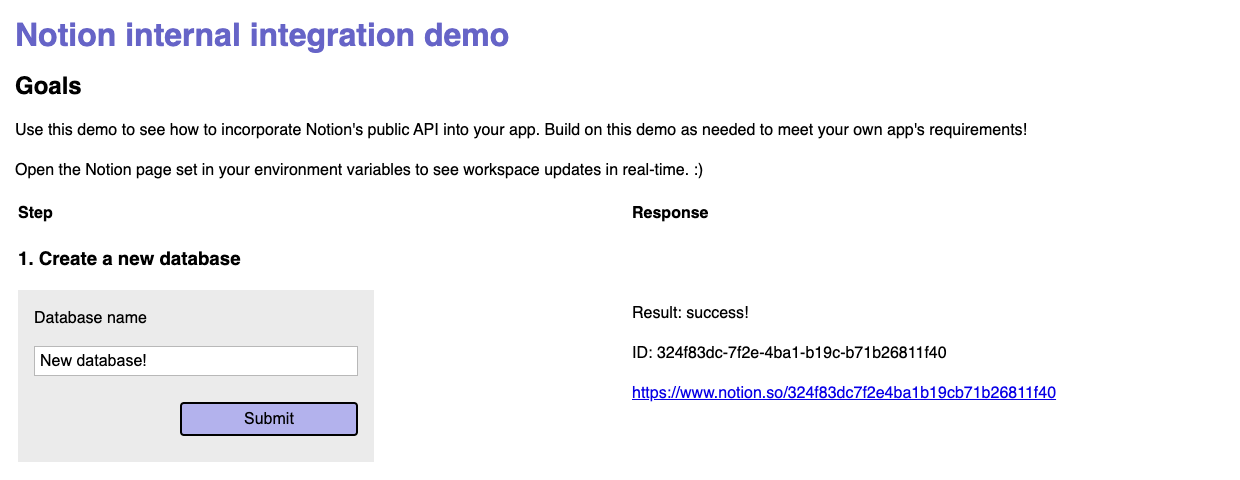
<Frame caption="Database form UI.">
  <img src="https://files.readme.io/36a22d6-dbform.png" alt=""/>
</Frame>


The completed [sample code](https://github.com/makenotion/notion-sdk-js/tree/main/examples/web-form-with-express) includes additional examples beyond what’s covered in this guide, including forms to:

- [Add a new page](/reference/post-page) to the database
- [Add content](/reference/patch-block-children) to the new page
- [Add a comment](/reference/create-a-comment) to the page content

### Requirements

To follow along with this guide, you will need:

- A [Notion account](https://www.notion.so/signup).
- To be a [Workspace Owner](https://www.notion.so/help/add-members-admins-guests-and-groups) in the workspace you’re using. You can create a new workspace for testing purposes otherwise.
- Knowledge of HTML and JavaScript. We’ll use [Express.js](https://expressjs.com/) for a server, as well.
- [npm and Node.js](https://docs.npmjs.com/downloading-and-installing-node-js-and-npm) installed locally to use the [Notion SDK for JavaScript](https://github.com/makenotion/notion-sdk-js) and [Express.js](https://expressjs.com/)
<Note title="SDK usage is recommended, but not required">
The [sample code](https://github.com/makenotion/notion-sdk-js/tree/main/examples/web-form-with-express) shown below uses the [Notion SDK for JavaScript](https://github.com/makenotion/notion-sdk-js) to make Notion API requests.

Using the SDK for JavaScript is not required to build a Notion integration, but many JavaScript & TypeScript developers prefer it due to its ease of use.
</Note>

## Getting started

### Create your integration in Notion

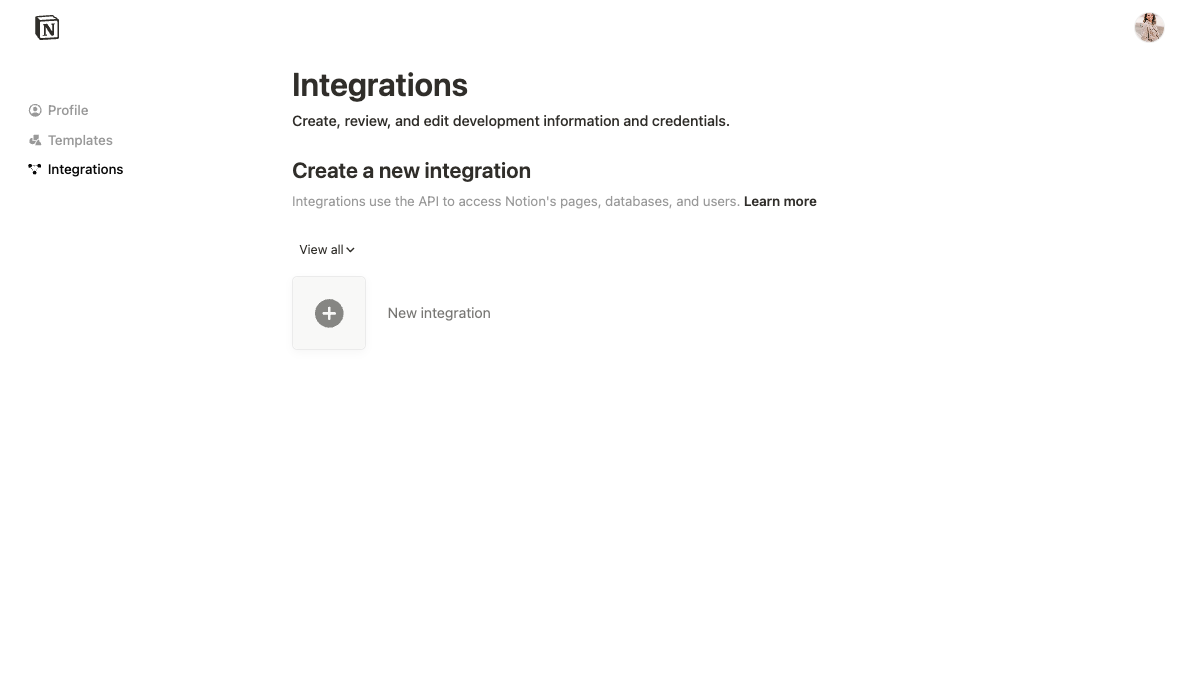
The first step to building any integration (internal or public) is to create a new integration in Notion’s integrations dashboard: [\https://www.notion.com/my-integrations](https://www.notion.so/profile/integrations).

1. Click `+ New integration`.

<Frame caption="Give your integration permission to add a database to a page.">
  <img src="https://files.readme.io/402cf3d-new_integrations_1.png" alt=""/>
</Frame>


Your integration can now make API requests related to this Notion page and any of its children.

If you are building a public integration, use the authorization instructions included in the [Authorization guide](/docs/authorization#public-integration-auth-flow-set-up) instead.
<Warning title="Double-check your page access">
If your API requests are failing, confirm you have given the integration permission to the page you are trying to update. This is a common cause of API request errors.
</Warning>

***

## Setting up the demo locally

In this example, we’ll have three key files:

- `index.html`, which will contain our client-side markdown (HTML).
- `client.js`, which will contain our client-side JavaScript code.
- `server.js`, which will contain our server-side JavaScript code. This file contains all the endpoints to make requests to Notion’s public API, as well as to serve the `index.html` file. ([More on that below.](#step-3-importing-the-notion-sdk-serverjs))

All of the sample code is available in [GitHub](https://github.com/makenotion/notion-sdk-js/tree/main/examples/web-form-with-express).

<Note title="Various examples are available">
This integration includes frontend code, but integrations can be server-side only as well. See more examples of different integration use cases in [GitHub](https://github.com/makenotion/notion-sdk-js/tree/main/examples).
</Note>

### Clone demo repo

To run this project locally, clone the repo and install its dependencies ([Express.js](https://expressjs.com/en/starter/installing.html), [dotenv](https://www.npmjs.com/package/dotenv), and [Notion’s SDK for JavaScript](https://github.com/makenotion/notion-sdk-js)):

**`Shell`**

```shell Shell
# Clone this repository locally
git clone https://github.com/makenotion/notion-sdk-js.git

# Switch into this project
cd notion-sdk-js/examples/web-form-with-express/

# Install the dependencies
npm install
```

### Environment variables

In your `.env` file, add the following variables:

**`Shell .env`**

```shell Shell .env
NOTION_KEY=<your-notion-api-key>
NOTION_PAGE_ID=<parent-page-id>
```

Add the API secret you retrieved in `Getting Started` to `NOTION_KEY`, as well as a page ID (`NOTION_PAGE_ID`) for the page that you gave the integration permission to update.

<Tip title="How database IDs work">
When using the API to [create a database](/reference/create-a-database), the parent of a database must be a Notion page or a [wiki](https://www.notion.so/help/wikis-and-verified-pages) database. To get the ID of the page, locate the 32-character string at the end of the page’s URL.

![The page ID is highlighted.](https://files.readme.io/7e8a54d-notion-page-url.png)
</Tip>

As a best practice, add `.env` to your `.gitignore` file to ensure you don’t accidentally share these personalized values.

### Running the project locally

To run this project locally, you will need to enter the following command in your terminal:

**`Shell`**

```shell Shell
npm start
```

Next, let’s look at how our database form works.

***

## Creating a new database

### Step 1: Adding a database form (`index.html`)

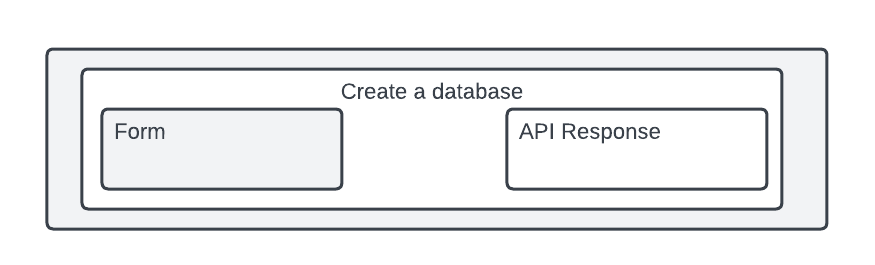
In our `index.html` file, we need a form for the user to create a new database and an area for the API response to be displayed. This is how the user will initiate a public API request.

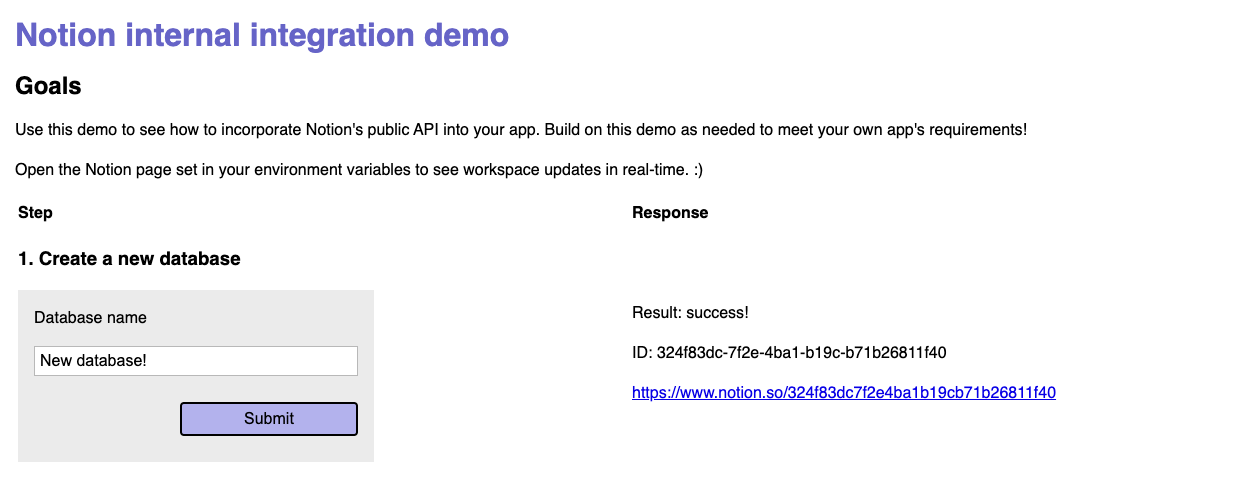
<Frame caption="App design for creating a database.">
  <img src="https://files.readme.io/76077fd-new_database.png" alt=""/>
</Frame>


<Frame caption="Rendered app design for creating a database.">
  <img src="https://files.readme.io/c73de3e-dbform.png" alt=""/>
</Frame>


The corresponding [HTML elements](https://github.com/makenotion/notion-sdk-js/blob/main/examples/web-form-with-express/views/index.html#L40) related to creating a database are shown below:

**`HTML`**

```html HTML
<!DOCTYPE html>
<html lang="en">
  <head>
    ...
<!-- Import the webpage's stylesheet -->
    <link rel="stylesheet" href="/style.css" />

<!-- Import the webpage's client-side javascript file -->
    <script src="/client.js" defer></script>
  </head>
  <body>
    ...
      <table>
        ...
        <tr>
          <td>
            <h3>1. Create a new database</h3>
<!-- Form to create a database -->
            <form id="databaseForm">
              <label for="dbName">Database name</label>
              <input type="text" id="dbName" />
              <input type="submit" />
            </form>
          </td>
<!-- Empty table cell to append the API response to -->
          <td id="dbResponse"></td>
        </tr>
        ...
      </table>
    </main>
    ...
  </body>
</html>

```

In terms of what’s rendered in the `<body>`, notice the `<form>` element and an empty table cell with the ID `dbResponse`. The latter is where we’ll append the Notion API response information.

The database form includes two inputs:

- A text input for the database name
- A submit input to submit the form

Also of note: the `client.js` file is included in the document’s `<head>` tag, which allows us to apply client-side JavaScript to interact with these HTML elements.

### Step 2: Handling the form submission  (`client.js`)

In `client.js`, we can write a function to describe what should happen when the database form is submitted. In short, we want to make a request to `server.js` to then make an API request to Notion. The actual Notion API request will happen server-side to avoid exposing our API secret in the client. (In other words, it’s more secure!)

```jsx
// Assign the database form to a variable for later use
const dbForm = document.getElementById("databaseForm");
// Assign the empty table cell to a variable for later use
const dbResponseEl = document.getElementById("dbResponse");

// Add a submit handler to the form
dbForm.onsubmit = async function (event) {
  event.preventDefault()

// Get the database name from the form
  const dbName = event.target.dbName.value
  const body = JSON.stringify({ dbName })

// Make a request to /databases endpoint in server.js
  const newDBResponse = await fetch("/databases", {
    method: "POST",
    headers: {
      "Content-Type": "application/json",
    },
    body,
  })
  const newDBData = await newDBResponse.json()

// Pass the new database info and the empty table cell
// to a function that will append it.
  appendApiResponse(newDBData, dbResponseEl)
}

```

In this code block, we select the form element using its ID attribute with `getElementbyId()`.

Next, we attach an async function to the `onsubmit` event that will make a request to our local server’s `/databases` endpoint. (This endpoint will be described below in our `server.js` code.) The function is asynchronous because we need to wait for a response from our server before proceeding.

The response is then appended to our `index.html` document. ([More on this below.](#step-5-displaying-the-response-indexhtml))

### Step 3: Importing the Notion SDK (`server.ts`)

Let's start by looking at our `server.ts` file without the Notion-related endpoints:

**`JSON`**

```json JSON
require("dotenv").config();
const express = require("express");
const app = express();

// Notion SDK for JavaScript
const { Client } = require("@notionhq/client");
const notion = new Client({ auth: process.env.NOTION_KEY });

// <http://expressjs.com/en/starter/static-files.html>
app.use(express.static("public"));

// <http://expressjs.com/en/starter/basic-routing.html>
app.get("/", function(request, response) {
  response.sendFile(__dirname + "/views/index.html");
});

// listen for requests
const listener = app.listen(process.env.PORT, function() {
  console.log("Your app is listening on port " + listener.address().port);
});

```

This Express.js code will listen for requests to `/` (e.g., `localhost:<port>/`) and respond with the `index.html` file. That’s how the app knows to render our `index.html` code when the server is started.

To use the SDK, we import it at the top of `server.ts`. We also initialize a new Notion Client instance and set the `auth` option to the Notion API secret already set in the environment variables:

```jsx
const { Client } = require("@notionhq/client");
const notion = new Client({ auth: process.env.NOTION_KEY });

```

We can now make requests to Notion’s API in this file without having to worry about authentication again.

### Step 4: Handling the form’s POST request (`server.ts`)

Staying in `server.ts`, we can add the following code that will be invoked when the database form makes a POST request to `/databases`:

```typescript
app.post("/databases", async function (request, response) {
  const pageId = process.env.NOTION_PAGE_ID;
  const title = request.body.dbName;

  try {
    // Notion API request!
    const newDb = await notion.databases.create({
      parent: {
        type: "page_id",
        page_id: pageId,
      },
      title: [
        {
          type: "text",
          text: {
            content: title,
          },
        },
      ],
      initial_data_source: {
        properties: {
          Name: {
            title: {},
          },
        },
      },
    });
    response.json({ message: "success!", data: newDb });
  } catch (error) {
    response.json({ message: "error", error });
  }
});
```

`app.post()` indicates this endpoint is for POST requests, and the first argument (`"/databases"`) indicates this function corresponds to requests made to the `/databases` path, as we did in our client-side code above.

Next, we can actually interact with the Notion API.

To create a new database with one data source, we’ll use the [Create a database](/reference/create-a-database) endpoint:

```typescript
await notion.databases.create({...options})

```

To use this endpoint, we need to pass the parent page ID in the body parameters. This page ID is the one already set in the environment variables. The page ID **must** be included in this request.

```typescript
const pageId = process.env.NOTION_PAGE_ID;
...
try {
  const newDb = await notion.databases.create({
    parent: {
      type: "page_id",
      page_id: pageId,
    },
		...

```

(Note: Environment variables can only be accessed in `server.js` , not `client.js`.)

In this example, the title of the database should also be set. The title was provided in the form the user submitted, which we can access from the request’s body (`request.body.dbName`).

```typescript
  const pageId = process.env.NOTION_PAGE_ID;
  const title = request.body.dbName; // Get the user's title

  try {
    const newDb = await notion.databases.create({
      parent: {...},
      title: [
        {
          type: "text",
          text: {
            content: title, // Include the user's title in the request
          },
        },
      ],
      // ...
```

Finally, we need to describe the [data source's properties](/reference/property-object). The properties represent the columns in a data source (or the “schema”, depending on which terminology you prefer.)

In this case, our data source will have just one column called “Name”, which will represent the page names of its child pages:

```typescript
try {
    const newDb = await notion.databases.create({
      parent: {...},
      title: [...],
      properties: {
        Name: {
          title: {},
        },
      },
    })
...

```

Finally, assuming the request works, we can return the response from Notion’s API back to our original fetch request in `client.js`:

**`JavaScript`**

```JavaScript JavaScript
...
response.json({ message: "success!", data: newDb });

```

If it doesn’t work, we’ll return whatever error message we get from Notion’s API:

**`JavaScript`**

```JavaScript JavaScript
try {
...
} catch (error) {
  response.json({ message: "error", error });
}

```

Now that we have our new database, the response can be added to the HTML document via the client-side JavaScript (`client.js`).

### Step 5: Displaying the response (`index.html`)

Let’s first look at an example of the object the `/databases` endpoint responds with, which includes the [object](<>) that gets returned from the Notion API when we create a new database:

**`Response`**

```JavaScript Response
{
  message: "success!",
  data: { // from Notion
    object: "database",
    id: "e604f78c-4145-4444-b7d5-1adea4fa5d08",
    cover: null,
    icon: null,
    created_time: "2023-07-18T20:56:00.000Z",
    created_by: { object: "user", id: "44b170f0-16ac-47cf-aaaa-8f2eab66hhhh" },
    last_edited_by: {
      object: "user",
      id: "44b170f0-16ac-47cf-gggg-8f2eab6rrrra",
    },
    last_edited_time: "2023-07-18T20:56:00.000Z",
    title: [
      {
        type: "text",
        text: [Object],
        annotations: [Object],
        plain_text: "test db",
        href: null
      },
    ],
    description: [],
    is_inline: false,
    data_sources: [
      {
        id: "a2216f7f-574f-4ae7-8df9-9eb8a65ec62d",
        name: "..."
      }
    ],
    parent: {
      type: "page_id",
      page_id: "e7261079-9d30-4313-9999-14b29880gggg",
    },
    url: "<https://www.notion.so/e604f78c414548c6b7d51adea4fadddd>",
    public_url: null,
    archived: false,
    in_trash: false
  },
}

```

The most important information here (for our purposes) is the data source ID (`data.data_sources[0].id`). The ID will be required to make API requests to the [Create a page](/reference/post-page) endpoint, which is the next form in our completed demo’s UI.

Knowing this JSON structure, let’s now look at how `appendApiResponse()` works:

```jsx
const dbForm = document.getElementById("databaseForm");
// Empty table cell where we'll display the API response
const dbResponse = document.getElementById("dbResponse");
...

// Appends the API response to the UI
const appendApiResponse = function (apiResponse, el) {
  // Add success message to UI
  const newParagraphSuccessMsg = document.createElement("p")
  newParagraphSuccessMsg.innerHTML = "Result: " + apiResponse.message
  el.appendChild(newParagraphSuccessMsg)

  // See browser console for more information if there's an error
  if (apiResponse.message === "error") return

  // Add ID of Notion item (db, page, comment) to UI
  const newParagraphId = document.createElement("p")
  newParagraphId.innerHTML = "ID: " + apiResponse.data.id
  if ("data_sources" in apiResponse.data) {
    // Include the initial data source ID for database responses.
    // Pages must identify which data source under a database they live under.
    newParagraphId.innerHTML += "; Data Source ID: " + apiResponse.data.data_sources[0].id
  }
  el.appendChild(newParagraphId)

  // Add URL of Notion item (db, page) to UI
  if (apiResponse.data.url) {
    const newAnchorTag = document.createElement("a")
    newAnchorTag.setAttribute("href", apiResponse.data.url)
    newAnchorTag.innerText = apiResponse.data.url
    el.appendChild(newAnchorTag)
  }
}

```

`appendApiResponse(res, form)` accepts two parameters: the response (shown above) and the HTML element where we will append the response — in this case, an empty table cell next to the database form.

In this function, we first add a paragraph element to show the response message (i.e., whether it was a success or the error).

```jsx
const newParagraphSuccessMsg = document.createElement("p")
newParagraphSuccessMsg.innerHTML = "Result: " + apiResponse.message
el.appendChild(newParagraphSuccessMsg)

```

Then, we do the same with the database ID & data source ID after confirming the response was not an error:

```jsx
  if (apiResponse.message === "error") return

  // Add ID of database and data source to UI
  const newParagraphId = document.createElement("p")
  newParagraphId.innerHTML = "Database ID: " + \
    apiResponse.data.id + "; Data Source ID" + apiResponse.data.data_sources[0].id
  el.appendChild(newParagraphId)

```

Finally, if the response has a URL, we display that too with an anchor (`<a>`) tag. This allows the user to visit the database directly in Notion.

```jsx
  if (apiResponse.data.url) {
    const newAnchorTag = document.createElement("a")
    newAnchorTag.setAttribute("href", apiResponse.data.url)
    newAnchorTag.innerText = apiResponse.data.url
    el.appendChild(newAnchorTag)
  }

```

(Note: This function will be reused by other forms. Not all responses have a `url` property, which is why we check for it.)

Once this is done, our HTML document is updated and the form submission is officially complete.

## Testing the feature

Let’s see the final results of testing this new feature:

<Frame caption="Submitting the database form and visiting the Notion URL from the response.">
  <img src="https://files.readme.io/e58e2ed-newdb.gif" alt=""/>
</Frame>


The database form is submitted and the response from Notion's API is appended to our UI. :tada: We can click the link to visit the new database in Notion and confirm it worked as expected. 

As a next step, the new data source ID can be copy and pasted into the page form below it to create a new page in the data source. We can also use the page ID that the page form returns to add content to the page or comment on it using the block and comment forms.

We won’t cover the code for page, blocks, or comment forms here, but the code is all included in the [source code](https://github.com/makenotion/notion-sdk-js/blob/main/examples/web-form-with-express/views/index.html) for reference. It works the same as the database example.

As a next step, you could also try adding a feature to [retrieve all existing pages](/reference/post-database-query) in the data source, or [retrieve block children](/reference/get-block-children) (i.e., page content) for an existing page.

***

## Wrapping up

This guide demonstrated how to use Notion’s API (via the [Notion SDK for JavaScript](https://github.com/makenotion/notion-sdk-js)) to build an internal integration. With this demo app, users can programmatically create a new database in their Notion workspace by filling out a form in the app UI and making a request to Notion’s public API — the [Create a database](/reference/create-a-database) endpoint.

As a reminder, this example includes client-side code to allow for user interactions via a GUI (graphical user interface). Notion integrations do not require a UI, however. What you build is completely up to you!

To see examples of server-side-only integrations, test out the sample apps in the SDK’s [GitHub repo](https://github.com/makenotion/notion-sdk-js/tree/main/examples).

## Next steps

To learn more about authorizing API requests or to learn how to add an auth flow to your public integration, read the [Authorization guide](/docs/authorization) next.

### Additional resources

- [Reference documentation](/reference/intro)
- [JavaScript client](https://github.com/makenotion/notion-sdk-js)
- [Postman collection](https://www.postman.com/notionhq/)
- [TypeScript starter template](https://github.com/makenotion/notion-sdk-typescript-starter)
- [FAQs](/page/frequently-asked-questions)
- [Slack developer community](https://join.slack.com/t/notiondevs/shared_invite/zt-20b5996xv-DzJdLiympy6jP0GGzu3AMg)